I've been on a key fob jag lately. It started with a few dragon claw key fobs.
I posted them on Face Book and sold them quickly, even before I got a chance to list them in my Art Fire shop, Wyvern Designs.
I went on to make several more of these key fobs. Several in silver, one in purple,
one in green,
and one that's a bit macabre.
I've been playing with polymer clay and alcohol inks, lately, so I decided to use up some blank pendants I made some time ago. It was so much fun dripping the inks onto the blanks then manipulating it by tilting the pendant or using canned air to blow and blend the inks. After they dried, I starting seeing shapes in the swirls and smears, or maybe it was only my demented mind but I saw them none the less. This is my first attempt. I loved the look but realized that the clay was split along the side and would be useless as a key fob.
The next two came out better. This one is called Mushrooms On The Forest Floor.
And this one is called Wild Flower.
I have several more in the works and I seem to be addicted to finding shapes in the inks. I just hope that I don't get lost in the images in my key fobs. You might never hear from me again!
Showing posts with label polymer clay. Show all posts
Thursday, October 29, 2015
Wednesday, July 22, 2015
Playing With Polymer Clay
I am enamored with polymer clay. I don't remember when I discovered it, it might have been years ago when I watched Carol Duval on TV. I guess I'm dating myself, but oh well. Anyways, I started playing with polymer clay.
Way back in the stone age, the only type clay I could find, before the intervention of widespread internet shopping, was Sculpey, which while it is a good clay, it's not particularly strong and it is a relatively soft. Then I found Fimo, which I believe is made in Germany. Fimo is a tough clay in more ways than one. It is sturdy when baked but I found it to be an exercise in frustration to work with.
The first time I worked with Fimo, now this was years ago, it crumbled into a million itty bitty bits. I was picking up pieces of Fimo for days and cursing it the whole time. Then I got the brilliant idea of mixing in some liquid translucent polymer clay. That worked, after a fashion, but it took hours and hours of kneading and adding more liquid clay. It was messy and if I scratched my nose without thinking, I ended up with liquid clay smeared across my face! I would have chucked the whole mess against the wall but I was afraid of the mess it would make and I would have to clean it up. I abandoned Fimo for quite some time, after that. I understand that they revamped the formula to make it easier to work with but I still find it an exercise in frustration.
Then came Premo. Made by Sculpey, it's sturdier than the original but easier to condition than Fimo. I thought I was in heaven. I could create my pieces and not have to worry as much about the distortion that occurred with the softer clay. And I didn't have to give myself carpal tunnel while doing it! Perfect!
So there I was, happily kneading and creating until one day I happened upon another polymer clay artist's website. While reading the description of one of her pieces I noticed that she mentioned that her pieces were made of jewelry grade polymer clay. What was this?! Jewelry grade polymer clay??!! What had I been using all these years to make my pieces, chopped liver? I make jewelry, I use polymer clay, therefore the clay I was using must be jewelry grade, right?
Now, I'm naturally curious by nature, so I had to search for this elusive element. I scoured the web, trying to find this wonder clay. No luck! Almost every link for jewelry grade polymer clay had a number of different brands. I suppose I could have emailed this polymer clay artist and asked her, but some people are touchy about questions about their art and I don't take rejection well.
But during my search, I came upon a clay with the lofty name of Pardo Professional Art Clay. Well, being the professional that I am, I thought, this is perfect for me! I guess there is another version of Pardo which has beeswax added to it, not a good thing, in my opinion, and it was deemed too soft by the artists who tried it. But the professional clay does not.
Okay, I thought, I'll order some and try it out. That's when I came across a reference that mentioned using Pardo Professional Art Clay and alcohol inks. I must mention here that I'm a compulsive shopper when it comes to crafts. If I see something that piques my interest, I often buy it, even though I have no idea, at the time, what I'll use it for. As a consequence, I have plastic tubs full of "carp" that I've bought but never used. One such purchase was some alcohol inks. I bought them when I was making greeting cards and I thought they might be interesting to use. But since I sometimes have the attention span of a gnat, I lost interest in card making before I got to use the inks.
Now to the real reason for this post! Pardo Professional Art Clay and alcohol inks! I've used alcohol inks with Premo translucent clay with varying degrees of success. Premo tends to get sticky when mixed with the inks and I've had more success mixing in small bits of colored clay. So I sent for some PPAC(Pardo Professional Art Clay) Since acronyms are all the rage, I thought I'd make up my own! Plus I'm tired of typing out Pardo Professional Art Clay every time I mention it! Anyway, the same website had a selection of alcohol inks, as well, so I ordered more of those, since the package I bought years ago only had three different colors.
These are Tim Holtz alcohol inks. They have wonderful names like Wild Plum, Butterscotch and Pesto and come in little squeeze bottles. I couldn't wait! I watched and read tutorials on using alcohol inks with polymer clay while I waited for my package to arrive. What I neglected to assimilate was the fact that you should wear some sort of protective clothing while using these inks. I don't know how I manage to miss this salient fact but I did. Maybe I was just so excited to get started.
When my PPAC package arrived, I tore it open and spilled the contents onto my workbench. I conditioned the clay by kneading, let me mention that PPAC is not as easy to condition as Premo, but not as hard as the original Fimo, so I had to work at it a bit. I flattened out the clay by running it through my pasta machine at the thickest setting. I added a few drops of alcohol inks and carefully folded the edges of the clay around it. Well, I guess I wasn't careful enough. When I started to squeeze the clay to mix it, ink shot out of the little square of clay and all over my shirt, my workbench and my hands! It's a good thing my dog was on the other side of the room, otherwise he would have become know as Watermelon (the color I used first) rather than Finn!
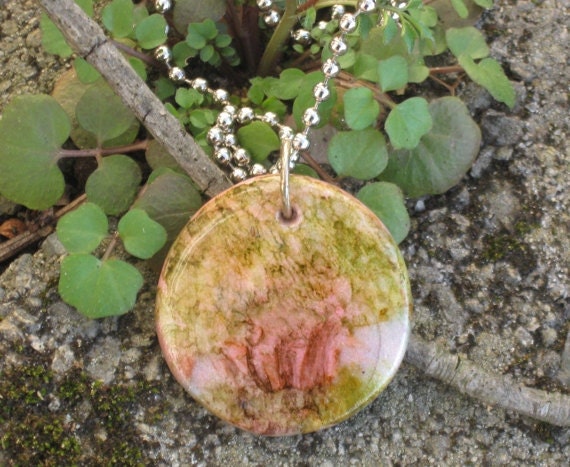
Luckily, my clothes were the old ones I use for working and my workbench is so stained with all and sundry that a few more stains didn't matter. My hands, on the other hand, were stained a lovely shade of pink for days! An elderly woman at the market actually asked if that was a new fad when she saw my hands! I learned my lesson after that and always use latex gloves when working with alcohol inks. And one other thing I've found, the color is not easily discernible with PPAC until you actually cure the clay. I was trying to make an orangey red clay for some little turtles beads. I mixed watermelon and butterscotch ink into the clay. This is what it looks like before baking, a kind of peachy brown:
This is after baking. I added a touch of gold mica powder mixed with translucent polymer clay and applied it to each segment of the turtle's shell.
I'd like to add that if you spread the ink on a slab of clay and let it dry, it's much easier to incorporate the color. Less messy as well!
Thursday, April 9, 2015
Week 4 of The Countdown To Mother's Day 2015 from Blue Morning Expressions
This is week 4 of Julie of Blue Morning Expressions
Countdown To Mother's Day Week 4
Pink flower lentil beads by Blue Morning Expressions
The intent behind this countdown is to help promote handmade artisan from all venues. The premise is that you may add three of your items for sale each week. But YOU MUST promote every item in the current countdown, either on twitter, Face Book, Google, or the preferred venues Pinterest and Wanelo. It's a lot of fun seeing what other artists are highlighting each week.
Paw Print Earrings by Shadow Dog Designs
Home Sweet Home Locket Necklace by Evezbeadz
These are just a few of the wonderful things that you will find on the Mother's Day Countdown.
Tuesday, March 17, 2015
Painting With Wool
I admit that I'm a novice when it comes to felting wool. But the process fascinates me. I haven't, so far, ventured into wet felting, although I'm seriously considering it. No, what I do is needle felting.
Wet felting involves applying warm soapy water to layers of fibers that are laid at 90 degrees angles to one another. Then, through repeated agitation and compression, the wool fibers "hook" together to form one cohesive piece of fabric.
Wool felts because the fibers are covered with tiny scales, similar to those on a human hair. When wet, these scales expand and the agitation allows them to hook onto each other, creating a felted piece of material. Plant and synthetic fibers will not felt.
Needle felting is much less involved. Since wool naturally wants to stick to itself when agitated, the use of a felting needle facilitates the process. A felting needle has notches along the sides of the needle near the point that "grabs" the wool fiber and tangles it together, forming a unified piece of fabric.
I've made bottle cap pincushions using this method. They are tiny little things measuring a few inches in height. I cheated a bit. Basically because I'm cheap,I used an old sweater that I had previously felted for the core, needle felting it into a sphere. Then I used the more expensive roving to cover the ball.
Purple and White Bottle Cap Pincushion
Hand Embroidered Miniature Bottle Cap Pincushion
But my latest project is a leaf shaped Amulet Pouch
I started this project with a piece of off- white 100% wool felt.
The next step was to needle felt over this base with various colors of wool roving. I chose greens, yellow, orange, and purple to give the finished leaf an Autumn look.
I have two different felting needles. The one on the left is a single needle, while the one on the right has multiple needles in a finger saving case. I'll warn you right now, that you DO NOT want to needle felt while watching television. I have the scars to prove that it's not a good thing!
Finished piece of needle felted fabric
Needle Felted Piece With My Leaf Patterns
I cut out two of each size. I never did use the smaller on. Oh well, maybe another project.
Thursday, December 4, 2014
Here comes Christmas!
Christmas is comeing up fast and I've been working furiously to get everything I've made lately listed in my Art Fire shop. Here are a few of the items I've recently listed.
Millefiore Key Chain
Pickle Ornament
Snowman Ornament
Merry Snowman Ornament
Some new Buttons
Kaleidoscope Earrings
Millefiore Key Chain
Pickle Ornament
Snowman Ornament

Kaleidoscope Earrings
And some round Dangle Earrings
I hope everyone has a very happy Holiday Season!
Tuesday, November 11, 2014
If I only Had Time...
There are many things I'd love to learn to do. Sky dive, scuba dive, drive a race car. But those are pipe dreams. There are a few more that are a bit more realistic.
I've always wanted to learn how to throw a clay pot. Martina of Pottery Heaven on Etsy has this skill down to a science. She make wonderful mugs, unity sets, and pendants, using her skill as a potter. I have worked with clay only once and that was in high school. I had a large bowl using the coil method but throwing a pot on a wheel is a dream I have. Unfortunately, I don't have the time to learn, right now so I can only admire those who have the time and skill to do this wonderful work.
This Pillar Candle Holder is an example of her work.
Another thing I'd love to try is using alcohol inks to paint on polymer clay. Valerie from Valeris's Stuff on Etsy does some beautiful work using this technique. I work with polymer clay but have never tried this technique. Her pieces are gorgeous and I'm going to have to try this out for myself, but for now I will just have to admire her wonderful pieces.
I particularly like this piece called A Stand of Trees Pendant . I can definitely see the trees in the swirl of color.
Some day I will get around to doing all the things I'd love to learn but for now I will just admire the work of those who have mastered them and enjoy their beautiful work.
Wednesday, July 30, 2014
It's Summer Time!
We are about half way through Summer and it's time for a post featuring some hand made products that evoke the feeling of Summer.
Here are some items from the members Blogging Again Ring on FaceBook that remind me of Summer.
Summer time is a time when we all need a new tote and this Extra Large Earth Tones Coffee Bean Burlap Tote by HevVinDesigns is a perfect bag to bring along to the farmer's market or the beach.
Summer is the perfect time to adorn yourself with new jewelry. This Show Your Soul Stacking Bracelet by TL Yarn Crafts will show your style, as well as your soul.
You can never have too many earrings and these Organic Green Ruffled Leaves Dangle Earrings by Fantasy Clay Store are the perfect compliment to your summer time wardrobe.
Summer time is a time when the countryside is full of butterflies. These Butterfly Wine Glass Charms by Pottery Heaven would be lovely gracing your wine glasses at your next outdoor gathering.
Since summer is a time when flowers abound and run riot through every yard and field, I had to include this Hand Drawn bouquet of Flowers Polymer Clay Brooch Pin by Valerie's Stuff to satisfy my floral fix.
So go out and enjoy you Summer and don't forget to bring something hand made along with you!
Labels:
Blogging Again Ring,
bracelet,
brooch,
burlap,
earrings,
HevVinDesigns,
jewelry,
polymer clay,
pottery,
Pottery Heaven,
summer,
TL Yarn Crafts,
tote,
Valerie's Stuff,
wine glass charms,
Wyvern Designs
Monday, March 10, 2014
Ways To Rejuvenate Old Polymer Clay - Sit On It!
Like most polymer clay artists, I always make way too much of custom colors when I'm making one of my pieces. I'm always afraid I'm going to run out before I'm finished. Consequently, I usually find that I have lots left over. I'll wrap the left overs in plastic wrap, put them in my stash, which is a large plastic tote bag and forget about them.
Then, sometimes months later, I'll find them again and get an inspiration for a new piece. Unfortunately, the balls of polymer clay have dried out and are hard and crumbly and basically unusable. I'm always bummed out when this happens and I'm way too unorganized to have written down the recipe of how I made this particular color.
I've picked up a few tips on how to rejuvenate these sad lumps of clay:
Tip 1: Sit on it! I've found that if I put the hard clay on my chair and sit on it for a while, the warmth of my body will help soften it enough so that it eventually becomes pliable enough to knead with my hands.
This is usually a long and tedious process but it does work, sometimes. Just be sure you wrap the clay in plastic wrap before planting your butt on it, otherwise you might end up with polymer clay smears all over your favorite pair of jeans and/or your chair!
Tip 2: If your not planning to sit for any length of time, wrap the polymer clay in plastic wrap and put it in your pocket. Same theory as the method above, but you'll be mobile and won't have to sit in your chair.
Tip 3: Add some liquid polymer clay to the mix. I use Sculpey Translucent Liquid Polymer Clay because I bought several bottles of it years ago and haven't used it up yet. It's still good and I'm too cheap to go out and buy some more.
This method can get messy, though. I use it when the clay is a bit pliable but cracks when it's run through my clay pasta machine. You can roll out a sheet of the semi-workable clay, spread some liquid polymer clay on it, then fold it, trying to seal the edges and run it through the pasta machine. The liquid clay usually squirts out the sides and gets all over everything, but it does work. Another method is to knead the clay with some liquid clay mixed in with your hands until it's pliable enough to work with. Either method is quite messy, so be prepared to have liquid clay all over your hands and quite possibly your entire work space!
Tip 5: This one's not for rejuvenating the clay but is an alternative on how to use that dried up ball of clay. Grate it! Use an old cheese grater (one that you don't mind delegating to the exclusive use with polymer clay) and grate up the mummified clay. The subsequent shavings can be used as an inclusion in fresher clay. This method can be used to make simulated turquoise or any other type of stone or material that has inclusions in it.
Well, that's it for today. I've been sitting on a hard lump of polymer clay (wrapped in plastic, of course) and now it's time to see if I can work with it. Hope these tips help you out in your polymer clay journey!
Tuesday, October 22, 2013
Subscribe to:
Comments (Atom)


