Showing posts with label Wyvern Designs. Show all posts

Saturday, May 5, 2018

Bunnies, Unicorns and Loveys, Oh My!

I have always been drawn to handmade toys for kids.  So I decided to make some of my own!

This little Stuffed Bunny is hand crocheted from organic cotton yarn that is produced in the USA.  It is soft and cuddly and will quickly become a bedtime favorite for your little one.  The bunny is filled with polyester fiber fill and has an embroidered nose and eyes, no small parts to come off.

The pattern for this adorable bunny is from One Dog Woof, the creator of many wondrous and adorable crochet items.  The pattern is a free one and she is alright with crafters selling their items using her pattern, as long as credit is given. 
What you can not do is claim and/or sell the pattern as your own.  


This Elephant Lovey, with it's riotous colors reminds me of a circus.  The small elephant head and arms are securely attached and there are no small pieces to come off, so it is safe for the youngest of children.  The "lovey", is a large granny square and both the elephant and lovey are hand crocheted from acrylic yarn.


This Unicorn Stuffed Toy is a delight, with here long psychedelic hair and curly tail, she will be a much loved toy for your little one.  She is hand crocheted from acrylic yarn and filled with polyester fiber fill.  All parts and pieces are securely attached, so she would be safe for young children.  This little gal was made using a pattern from One Dog Woof  Rainbow Unicorn.  This pattern is also free and sales of the finished product are allowed with credit given.  What you can not do is claim and/or sell the pattern as your own. 


I hope you like all my creatures.  They can be purchase using the above links or, if you are a crocheter, I've included the links to the patterns.

Friday, February 23, 2018

Fashionable Monkey Fist Knot Key Chains

I love tying these wonderfully intricate knots.  They look complicated but once you start, you just can't stop!  These key chains come with a 1 inch key ring and a 1.5 inch blue metal carabiner. Never lose your keys again!  These key chains can be clipped to a belt loop, purse or backpack.


Rainbow Monkey Fist Knot Key Chain


The monkey fist or paw knot is an ancient knot used by sailors and climbers. The monkey fist or paw knot s a type of knot, so named because it looks somewhat like a small bunched fist. It is tied at the end of a rope to serve as a weight, making it easier to throw, and also as an ornamental knot. It was also used in the past as an anchor in rock climbing, by stuffing it into a crack.

It has also been used as a weapon, but none of my Monkey Fist Knot Key Chains are meant for such a use.  Most of my key chains have a felted wool ball at their center.  A few have a small wooden ball inside.

Red Monkey Fist Knot Key Chain


If you love purple, this purple Monkey Fist Knot is just for you!

Purple Monkey Fist Knot Key Chain


And for the guys, Green Camo Monkey Fist Knot Key Chain


Thursday, February 1, 2018

Hand Felted Leaf Shaped Amulet Pouch


 Hand Felted Leaf Shaped Amulet Pouch


This amulet pouch is constructed from hand felted wool in a leaf shape. The wonderful swirls of purples, orange, yellows, and green evoke a walk in the forest.

This amulet bag has 3 silver leafed leaf charms, hand made polymer clay beads, and I have used a 26 inch piece of recycled sari silk to hang from your neck.

Wear this leaf shaped amulet bag near your heart and filled with your favorite talisman, whatever you use to bring you good luck... a gem or stone, coins, drawings, dried plants or herbs, even words or prayers.

If you know someone who is going through a tough time include a prayer for them in your amulet bag. You will be reminded to include them in your good wishes each time you touch the bag. The bag can be worn inside your clothing and so be closer to your heart.

If you feel unsure about purchasing from me on my blog, here are links to my Amazon and Etsy stores.  Feel free to check out my reviews!

Wyvern Designs on Amazon

Wyvern Designs Home on Etsy

Tuesday, January 30, 2018

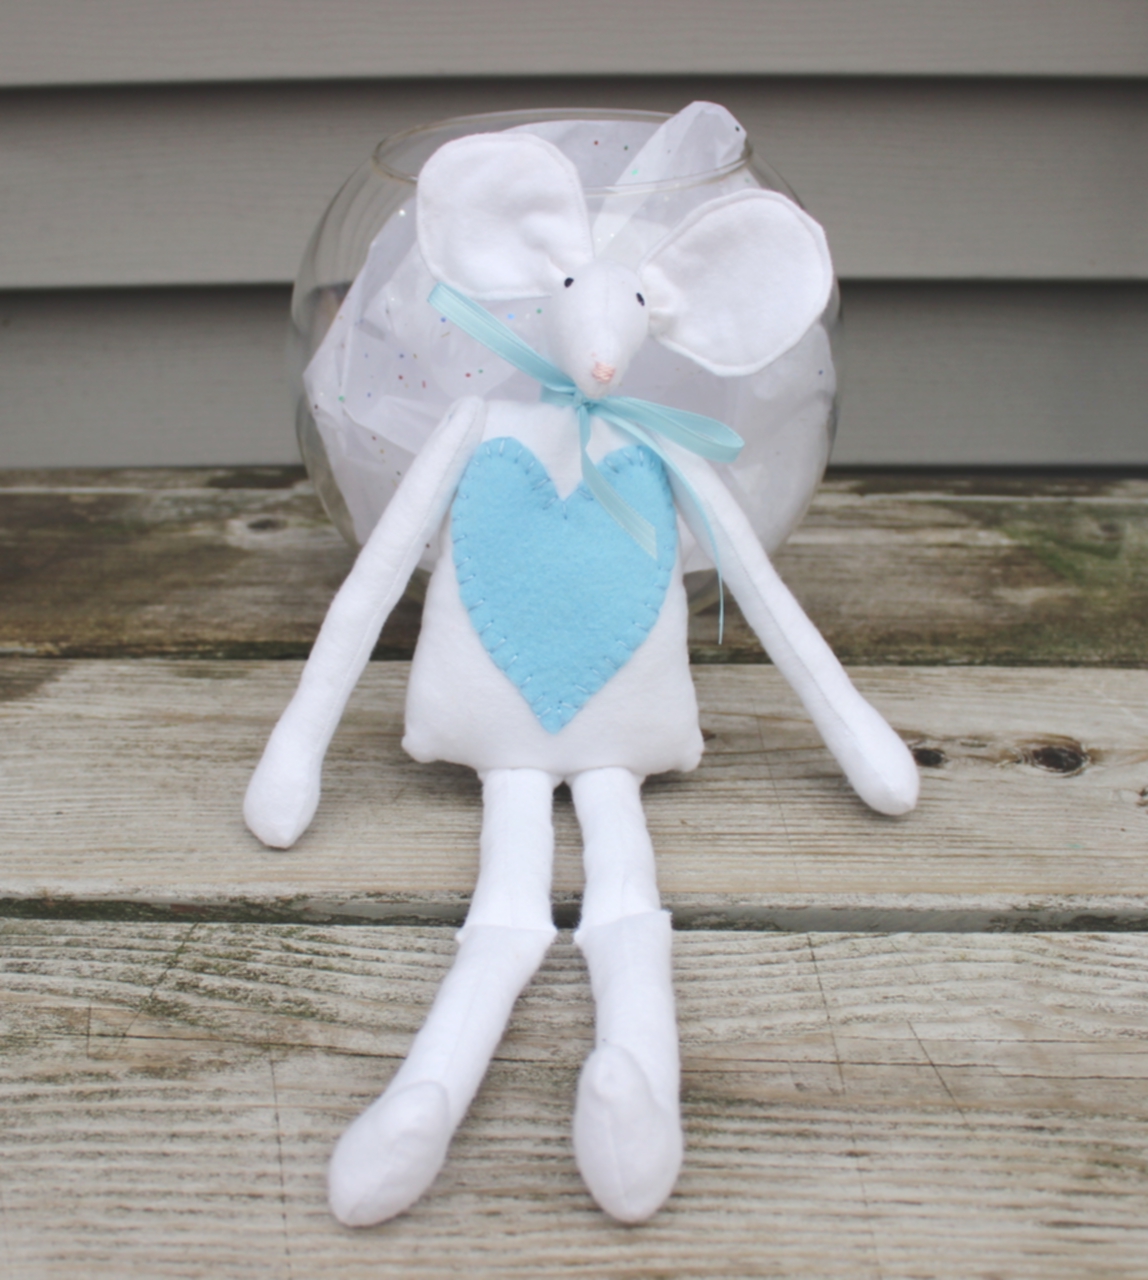
Flannel Mouse Plushie With Heart

Do you love Plushies?  Here is an adorable Stuffed Flannel Mouse Plushie that will enchant both you and your child.  Hand crafted from soft white flannel, this little guy is 14 inches tall.  He has embroidered black eyes and an embroidered pink nose.   He is filled with hypo-allergenic fiber fill and all parts are securely stitched.  This toy is not recommended for children under 3 years old.

This little guy is $18.95 USD plus $4.50 USA domestic shipping.

Check out my stores on Etsy and Amazon for reviews.
Wyvern Designs on Amazon

Wyvern Designs Home


Friday, April 28, 2017

Monkey Fist Knot Key Chains

I'm not  big on the outdoors or sailing  but I've fallen in love with the monkey fist or paw knot.  It's an intricate looking but surprisingly simple knot that is fascinating and satisfying to tie.

The monkey fist knot or monkey paw is a type of knot, so named because it looks somewhat like a small bunched fist. It is tied at the end of a rope to serve as a weight, making it easier to throw, and also as an ornamental knot. It was also used in the past as an anchor in rock climbing, by stuffing it into a crack.

I've started using this knot to make key chains and zipper pulls.  My key chains are lightweight because I use a hand felted wool ball as the center.  When researching on how to tie the monkey fist knot, some tutorials recommended a metal ball for use as the center but I prefer the felted ball.  The felted ball is lightweight and so will not add a lot of extra weight to your pocket, belt, purse or backpack.

Rainbow Monkey Fist Knot Key Chain
 
Camo Green Monkey Fist Knot Key Chain
Rainbow an Neon Yellow Monkey Fist Knot Zipper Pulls

Wednesday, May 18, 2016

Resin D'etre or What Can You Do With Spare Ceramic Tiles?

Good question!  Well, mine weren't exactly spare because I went to the home improvement store and bought some but this will work for anyone who has some ceramic tiles hanging around from a bath or kitchen renovation.

Flowers on Trellis
 Large Flower
Group of Hyacinths


Let me start from the beginning.  I have these alcohol inks that I bought some time ago.  If you've read any of my prior post, you'll know that I have all kinds of materials and supplies stashed away that I bought for no other reason than I might use them someday.  I think I bought the inks when I was in my card making phase but I'm not sure.  It could have been when I was in my let's try to dye polymer clay, or what can I dye with this phase.  Anyway, I had the inks and I stumbled on a video on You-Tube involving ceramic tiles and flaming alcohol inks.  I actually wrote another post about where I made a few pendants and a set of accent tiles.  If you're interested, you can read it here.  Burn The House Down!

This time I was going to make some ceramic tile coasters for my sister's birthday.  I actually tried to make the alcohol paintings look like something, instead of slopping the ink on and later deciding what shapes I saw.  I think I managed pretty well.  After the tiles were dry, I started with the resin.  For those of you that don't know, resin is extremely sticky!  It also requires precise measuring and mixing time to make it set right.

This is where the Resin D'etre comes in.  Alcohol inks will not stand up to hot, cold or wet environments.  I've done research looking for something that would make the inks impervious to their environment.  Pretty much the only thing I found was resin. I bought some Envirotex Jewelry Resin  The first time I used resin was for some ceramic pendants.  I was kind of nervous, since everything I read about resin indicated that it was difficult to use.  There was the whole precise measuring, then timed mixing and the pouring, oh the pouring!

Actually it wasn't that bad.  I measured out the resin in one of the little cups included in the kit.  Then I added the hardener.  One tip:   I marked the cups with a Sharpie to indicate the amount of each I needed.  You need equal part resin and hardener in order for the mixture to set right.

Then you have to stir it, and stir it, and stir it!  For at least two minutes.  You have to make sure that you stir and scrape the little cup, then stir and scrape some more.  After two minutes, you pour it into another little cup and stir and scrape  some more.  After another minute of additional  stirring, it's time to pour.

I was nervous at this stage.  I wasn't sure how much resin to pour on the pendant.  I had mixed up a total of 1 ounce of resin.  Would it be enough?  Would I have a half coated pendant?  It turns out it was more than enough.  It's a good thing I had a total of three pendants ready to go.  I used up all the resin I had mixed.

Now comes the really hard part.  I had read that you should put some kind of tape around the edges at the back of the piece.  That way any drips that you miss will come off with the tape.  Being an over-confident kind of gal, I figured I didn't need the tape.  I could just scrape any excess off, right?  Wrong!

I placed the pendants onto little inverted cups, so that any excess would drip off.  I had also lined the pan I was using with parchment paper.  So I poured away.  Resin immediately started to drip over the sides and collect underneath.  I was using one of the wooden stick included for stirring to scrape the drips but the pendants and the cups were so light that they kept getting away from me.  I did the best I could but the resin kept dripping and I kept wiping.  After the three pendants were coated, I set my timer for 25 minutes.  Although it says that the resin degasses itself, from all the bubbles I saw, I wasn't so sure.  By some miracle, I must have done everything right!  No bubbles and eventually the dripping stopped.

After 24 hours the resin had set but I had these big globs of resin on the underside of the pendants.  I sanded like mad, but never did remove all the globs of resin.  That's when my ingenuity (or desperation, if you like) kicked in.  I had some black leather that I had purchased for another project.  I cut circles to fit the pendants, glued them in place and problem solved!


Anemones Under The Sea Pendant 


Flower Garden Pendant 

Right now I'm working on a set of four ceramic tile coasters.  I feel more secure using the resin and I think that they are coming out beautifully.


In conclusion, like I've said before, if you want to try something new and out of your comfort zone, I say go for it.  You learn from every new endeavor, even if you fail.  Keep trying until you get it right!


Wednesday, March 30, 2016

A Basket Case

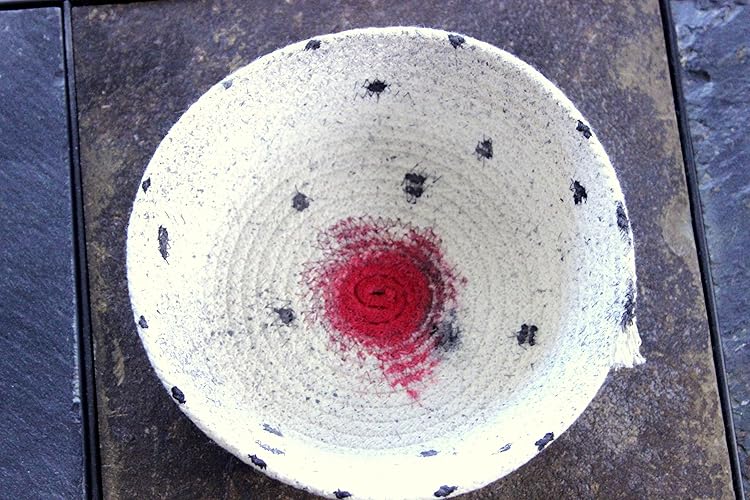
 Black White and Red Coiled Rope Basket


 I've recently started to make coiled baskets using clothesline rope.  I've always admired basket makers.  The fact that they can take the most mundane of material i.e. rope, grass or thin strips of wood and turn it into beautiful and useful storage and decorating pieces always intrigued me.

I decided to start with rope.  My sister makes these wonderful pocketbooks by wrapping fabric strips around clothesline rope and stitching them together.  Being the perverse person that I am, I thought I'd skip the wrapping and try dyeing the rope.  Easier, right?  I wouldn't  have to buy, wash, iron and cut fabric.  I could just slap some dye on the rope and start stitching.  Well, not quite.

Dyeing the rope turned into  a messy involved process.  I started with some ordinary cotton clothesline rope.  I had some on hand since I am one of the few people left in the United States who prefers to dry my laundry using my solar clothes dryer, otherwise known as the sun.  The last time my clothesline broke and I had to replace the line, I had the forethought to save it.  Actually, it was my inner hoarder who kicked in to save it, but we won't go there.   I hate to throw anything away that I might be able to use later.  But never mind that.  I had the rope and since I'm a big advocate of instant gratification, I dug out some fabric dye that I bought a while ago.  I don't remember why I bought it.  Probably for some project which I obviously never attempted since the dye has been sitting in a drawer in my studio.  I never even opened it!

Anyway, here I was with about 100 feet of rope, several bottles of dye and no clue what to do next.  So, of course, I went to my fallback position when I don't know what to do, Google!  I did a bit of research and realized that maybe this wasn't going to be easier or faster than all that rigmarole with the fabric.  But since I had gone to all that trouble digging out the rope and dye, I felt I had to proceed.

First, I realized what a messy job I was getting into to.  For my first basket, I used a small cookie sheet as a tray.  I coiled the rope, I think it was about 9 feet long, on the sheet and started squirting dye.  I quickly realized my mistake.  My hands were a cacophony of colors and the rope looked like a box of crayons had thrown up on it.

In order to salvage it, I ran downstairs and searched for some surgical gloves that were left over from when I had my perforated appendix out and I needed daily visits from a nurse to change my bandages.  I found the gloves tucked in with some linoleum blocks that I bought to make prints with, because where else would any sane person store surgical gloves? and I raced upstairs to try to salvage my dyeing project.

I manage to clean my hands of most of the dye and stuffed my hands like wet sausages into the latex gloves.  I dug around under my sink until I found an empty spray bottle, another one of my idiosyncrasies, I always save a few spray bottles just in case I might need one.  I started spritzing the rope with water.  I sprayed until I liked the muted and diffuse colors of the rope.

Now what to do with the whole thing.  The instructions on the dye bottle said to leave the material to dry.  My rope was so wet, it would have probably taken weeks to dry inside, but luckily it was a bright, warm sunny Fall day outside.  I took everything outside to my deck and left it to dry.  It didn't take too long.  After a couple of hours, I went out and flipped the rope over and by nightfall it was dry.

Next I had to heat set the dye.  So I spent an hour with a dry, hot iron and finally the rope was ready to use.  The rest of the process, while fun for me, would be boring to read about so I'll skip it.  Here's my first attempt at basket making.
I found that despite the work and the mess, I liked dyeing and stitching my own baskets.  I refined the process a bit.  I now use a large steel tray that I had in my basement.  Don't know what it was for originally but my father had given it to me to store wood in when we had a wood burning stove.  It's about 3 feet long and 2 feet wide and I use clothes pins or clips to hold the rope up off the surface when dyeing and spritzing, so the rope doesn't get as wet as it did the first time.  I always use latex gloves, so my hands stay much cleaner.  It took forever for the color to wear off my hands and I could see people in the grocery store giving me peculiar looks while my hands looked like Joseph's coat of many colors.

I've made a few more baskets and will be making more.  My advice for anyone who would like to try something new, is to go for it.  Life is a learning experience and learning a new art can be both fun and enlightening.

Handmade Coiled Rope Basket in Variegated Greens and Yellow

Bath or Kitchen Storage Basket
Hand Dyed Basket In greens, Blues, and Yellows
Many Colored Basket

And my one attempt at making a trivet.
Hand Coiled Rope Trivet

Monday, February 29, 2016

Burn The House Down!


 Set of 3 Decorative Tiles

No, not really, but I have been playing with fire lately.  I found a video on You-Tube in which the author, a user called beetlewing, demonstrated how to use flame to intensify and change the manner in which alcohol inks react on ceramic tiles. Alcohol Inks Tutorial: Playing Wtih Fire  And since I've been playing with alcohol inks and various mediums lately, I decided to take a look.

His video is very good and he creates some wonderful pieces and since I  could only burn this particular  house down once, I decided I'd give it a go.  I found a wonderful ceramic artist who agreed to make me some glazed pendant blanks and I must insist  the blanks, tiles whatever, have to have a glaze on them, otherwise this technique won't work. Don't use any that say bisque fired.

 This particular ceramic artist's has a shop on Etsy called Pottery Heaven and while she doesn't normally sell pendant blanks, I contacted her on FaceBook and she agreed to make some for me.  Since I am naturally impatient when it comes to trying something new, I went to my local home improvement store and bought some 4.25 inch plain white ceramic square tiles, the kind you would use in a bathroom.

I already had the alcohol inks.  I don't know why I bought them in the first place, and I have used them on a few polymer clay pieces but they are so much more fun and work soooo much better on ceramic tiles!

Beetlewing on You-Tube used a cigarette lighter but I was afraid that using one would put my hand and clothing waaay to close to a live flame so I went out and bought a set of those lighters with the long nozzles that you use to light candles.  I used an old cookie sheet and I don't recommend baking cookies on it afterwards because mine is now covered with blobs and smears of dried alcohol ink and alcohol inks are pretty much permanent. 

I put the tile down on the cookie sheet, got out my alcohol inks and started squirting.  Let me say that alcohol inks dry really fast.  Luckily, newly applied alcohol inks can be removed from glazed ceramic tiles with rubbing alcohol.  I made lots of mistakes and had a lot of ugly tiles but finally I got my technique down pat.

I found that making sure the lighter was lit before applying the inks worked a lot better than trying to light the thing after the ink went down.  You should let each section of ink fully flame out before trying to apply more.  I couldn't figure out why one of my inks wasn't squirting out, until I looked at the bottle and realized that I had burned the tip closed!  I had to cut the tip and now it doesn't squirt out as fast as the others.  And here's a tip:  You can't really see the flame, the inks burn with an almost invisible blue flame.  So if you are going to try this, use caution and don't do it with little kids and/or pets around, especially cats or while wearing loose clothing!
I coated some of my pieces with resin (the first time I've ever used resin and that's a whole other story for another time).  

Here are a few more pieces I did.
Flower Garden Alcohol Ink and Resin Ceramic Pendant
 Anemones Under The Sea Alcohol Ink and Resin Ceramic Pendant

And these aren't quite ready.  They're still drying and I need to apply resin to them since they're destined to be a set of coaters.
I'm calling them Spring Garden since they are flower themed:
I recommend you try this technique.  It's fun!  Just don't burn the house down!